Introduction
When building gliders one item that is almost always used is sandpaper and the process of removing material using sandpaper is called sanding. Sanding is something that almost everybody has done but few have been given lessons or instructions on how to sand. The inexperienced builder sometimes consider sanding easy and not much to it, but the experienced model realizes that sanding is an art that takes practice and years of experience before done correctly. The typical instructions for building a glider just tells one to sand the balsa wood to shape. This document will explain my techniques for sanding/building gliders.
Sanding
Sanding is the process of removing material by taking a rough/harder surface and moving it across the piece that you what material removed from. The rough/harder surface is typically referred to as sandpaper and small "stones" on the paper grooves/cuts out material.
For the construction of gliders sanding is typically used to shape the airfoil of the wing, elevator and rudder. These shapes need to be precisely made (to within a few thousands of an inch; .002") if you want a glider to perform well.
Sanding vs. Planing
Many builders plane or carve the wood before they start sanding it to shape, especially if there is a lot of wood to remove. The advantage of planning/carving wood is that it removes wood quickly and does not create a lot of dust. It also typically does not crush the wood as much as other techniques which remove/shape wood.
Hand plane is a typical tool which every glider builder has. See Photo 1. Hand planes are generally the combination of a cutting edge, such as a sharpened metal plate, attached to a firm body, that when moved over a wood surface, take up relatively uniform shavings, by nature of the body riding on the 'high spots' in the wood.

A Razor Hand Plane
The disadvantage I find with the planning/carving process is you have less control of the amount of material you are removing and you need to learn another woodworker’s technique.
I still have not mastered the art of planning wood so I do not use the planning process when building a glider. I just sand longer and make more dust.
Tools For Sanding
One must think of sandpaper as a replacement part for the tool that is called a sanding block. You typically should do very little sanding without a sanding block. Why? Well I believe you lose control if you sand with just sanding paper. Sanding without a hard flat backing surface is the easiest way to make waves in the part that you are trying to shape.
So the first tool you need is a sanding block, actually many sanding blocks. See Photo 2 for my collection of sanding blocks. Now you can go to the typically hardware store and purchase a sanding block, but I don’t and here why. First the store’s sanding blocks are heavy and I need/want control. I don’t need some heavy sanding block, pushing on the wood, making me fight the forces of gravity while I am sanding. Also, the sizes and shapes in the hardware store never seem to be right for me. So I build my own sanding blocks out of balsa wood. Now you don’t need to use your lightest wood, just some junk balsa blocks with do just fine. You can cut the block to any size and shape you want and make it fit you hand, because to have control you need to be comfortable. Later I will discuss how to make a flat portion on your sanding block. Other things to note about a sanding block. The sandpaper must be attached to the entire surface of the block. I use double sided tape to accomplish this. If the sandpaper is allowed to float off the flat surface, your sanding precision will decrease. Also make sanding block as large as possible. The larger the sanding block the harder it is to rock the block. On the other hand you do need some small sanding blocks to sand in tight places.
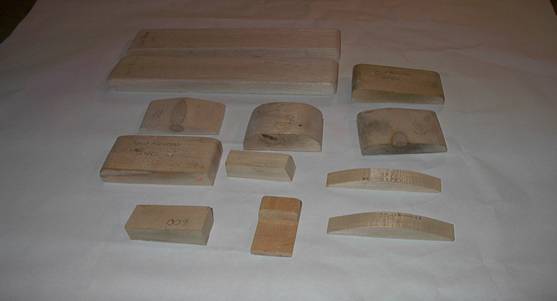
Collection of many different size and grit Balsa Sanding Blocks
The next tool you need is a hard, flat surface to sand on. I use glass plate. If you watch the garbage others throw out, you can typically find pieces of glass at the curb. The best is when someone replaces their windows, just pick up the window frame with the glass inside. It is pretty easy to remove the frame and then you will have your nice building surface. Marble is also good to work off of but more expensive and harder to find. See Photo Below.
Building/Sanding Surface. Note the duct tape at the one edge which is a sanding fixture/jig used to set the height (.025") of the trailing edge of a wing.
Another item I use a lot is masking/duct tape. It is amazing to me but sandpaper does not cut or sand duct tape or masking tape very well. So I use these tapes as tools and fixtures to control my sanding. I will discuss this a little more in detail later.
So to summarize, the tools you need are:
- Sanding Blocks: Lots of them!
- Sandpaper: Lots of different grits.
- A Flat Surface
- Double Sided Tape
- Masking\Duct Tape
Sandpaper
I purchase all my sandpaper from the local hardware store. I found the cheaper sandpapers don’t do as good of job as the expensive ones. I use a 3M product called SandBlaster. See photo below.
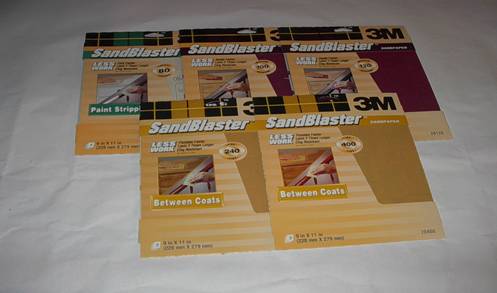
SandBlaster sandpaper in a variety of grits.
Basically sandpaper is made from three components. One is the paper or backing surface the "stones" are glued on to. The cheaper sandpaper uses poor quality backing paper, which can be inconsistent in thickness and not very durable. Next is the glue which is used to glue the "stones" to the paper. Again the cheaper the sandpaper the poorer the quality of glue is used. Finally there are the "stones". There are two important features of the stones. One is what material they are made from. Stones made from hard material make sanding process easier and more precise. The second is the size of the "stones". The size of the stone is characterized by the grit of the sandpaper. Sandpaper comes in a variety of grits usually ranging for 60 to 1500. 60 grit is very rough and 1500 grit is very smooth. . A table below shows the sandpaper grit number and the corresponding "stone" size.
| Grit | Average Particle Size (in) |
| 60 | 0.0104 |
| 80 | 0.0075 |
| 100 | 0.0055 |
| 120 | 0.0045 |
| 180 | 0.0032 |
| 220 | 0.0027 |
| 320 | 0.0014 |
| 400 | 0.0009 |
| 600 | 0.0006 |
| 1000 | 0.0004 |
Precision And Grit Number
If one spends some time to think about things is pretty clear the lower the grit number the more material is removed per each stroke. Also the more material that is remove the less precision you will have. If one puts a piece of sandpaper under a microscope they would see the following;
Also if one puts the piece that is being sanding under the microscope they will also see similar mountains and valleys.
If one want to shape something precise then these mountains and valleys needs to be minimized. In engineering terms this is referred to as surface finish. If someone wants to make a wing .235" thick at the high point and wants the thickness to be precise to .001" then it should be clear one needs to be sanding with at least a 320 grit sandpaper (see table above).
Going Through The Grits
Woodworkers have used the term "going through the grits" to describe how one should properly sand. What this means is that you should start with low number grit sandpaper and as you get closer to the desired shape or thickness you start going up in grit number. Here’s my general rule of thumb;
| Grit | Distance From Desired Shape |
| 60 | 0.060" |
| 100 | 0.040" |
| 120 | 0.032" |
| 220 | 0.010" |
| 400 | 0.005" |
| 600 | 0.001" |
At the low grit numbers I find that the stones tear the wood and one needs to be careful not to tear the balsa wood which creates large valleys.
Making A Sanding Block
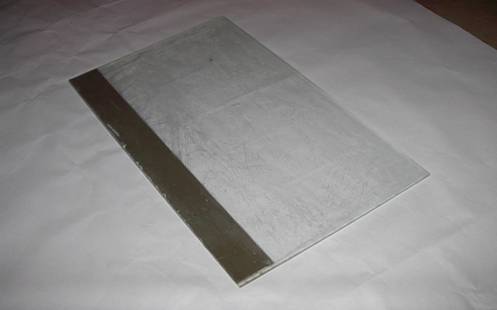
Making a sanding block is easy once you know how. Get a piece of balsa wood and cut it into a block. Shape the top and sides of the block to make it feel good in your hand. Next make the flat sanding portion of the block by using your flat sanding surface. Typically you want a very flat, smooth surface on the sanding block which you attach the sandpaper to. To get your sanding block flat and smooth, I use sandpaper, a aluminum plate and some double sided tape. Attach a large 8.5"X11" piece of sandpaper to the aluminum plate using the double sided tape and then just take your sanding block and sand the surface flat. See Photo 5. Be careful not to rock the sanding block as you move it across the sandpaper.
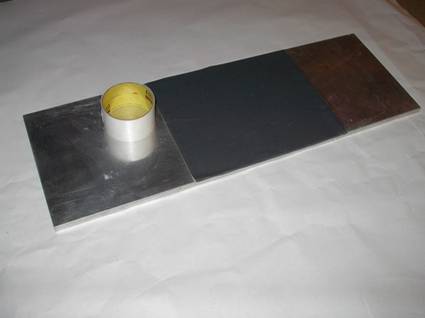
Flat Aluminum Surface with Sandpaper attached to make sanding blocks.
A roll of double sided tape is shown also.
Next take some double side tape or carpet tape and attach it to the flat sanded surface of the balsa block. Finally take the desired sandpaper (grit number) and attach it to the tape. Your sanding block is complete.
Sanding Mechanics
The sanding mechanics, the motion and pressure used to sand is something that is very hard to describe and really takes practice to master. I don’t worry about going across the grain, so I sand with circular motions. The most important thing is not too hard of pressure. Pressing down hard on the sanding block is easy to do since the harder you press the more material you can remove but pressing hard also cause heat and heat causes the wood to expand. Wood that is locally being heated and material being removed at the same time causes huge waves and warps. Related to this is how "used" the sandpaper is. Sandpaper wears out or dulls and dulled sandpaper make you press harder to remove material. Remember pressing hard is not a good thing so replacing the sandpaper on your sanding block frequently is very important. What I do is replace the paper on all my blocks when I start a new glider.
10 Basic Steps To Making A Glider Wing
- Choose a glider design, get plans and make templates and fixtures.
- Choose the piece of wood. Evaluate for:
a) Size
b) Weight
c) Stiffness
d) Grain - Trace out platform outline of wing
- Cut platform outline of wing
- Glue on Hardwood Leading Edge (optional)
- Sand the bottom of the wing flat
- Sand root to tip taper. See Photo 6.
- Sand highpoint to trailing edge shape. See Photo 7.
- Sand LE to high point shape
- Sand Upsweep